
I am in LOVE with my new cupcake stand. I did not own one yet. I kept waiting for the perfect stand that screamed my name. I have passed by the stand at Target many times and almost bought it – but always put it back. Now I am glad I did.
This one is made by Chad. I have the best hubby ever. He put this together for me. This idea came from 2 great blogs!!
I first saw this at Lizard & Ladybug. I drooled over her cupcake stand. She shared how she made hers. SOO SOO EXCITING. I waited till I got a 50% off coupon at Michaels to go purchase the 4 piece cake pans.
Then a girlfriend pointed me to another fun blog – Giverslog. They too were inspired by Lizard and Ladybug– and went a little bit of a different route on theirs.
Mine is a mix of both blogs. 🙂 So be sure to stop by to see their tutorials too. If mine is not as complete. I forgot some steps to photograph.

Finding the center to all of the pans, Chad marked the center on the bottom with a permanent marker.

Using a drill bit that fit the size of our ALLTHREAD- he drilled a hole in each of the pans. (YES– he is doing this on my good counter tops in my kitchen.. ack!!!)
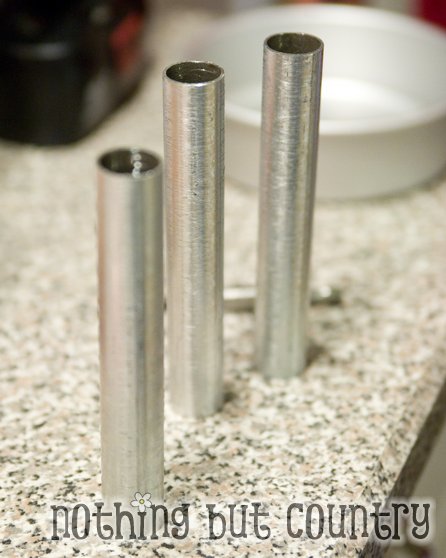
Just so you know– no holes were made in my counter top in case you were worried as I was.. HAHA
Using 3/4 inch conduit pipe from our local home improvement store. He cut them evenly at 6″ inches each. Some commented on the Giverslog blog their stores would cut pipe for them. Ours would not. So when you cut 6″ make sure it is flush or you will have a crooked cake stand.
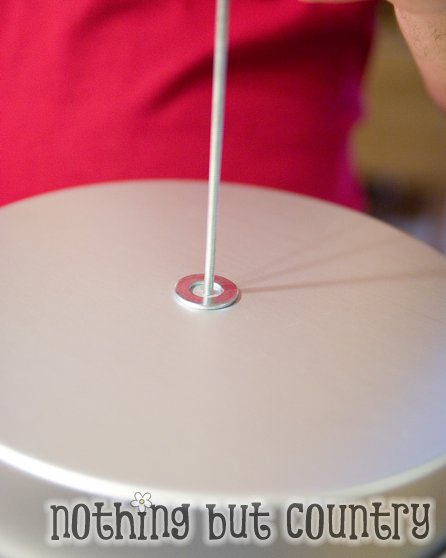
You can find the washers at the home improvement store- my large washers were just a tad bigger than the 3/4 inch conduit. We started to assemble the cupcake stand from the top down.
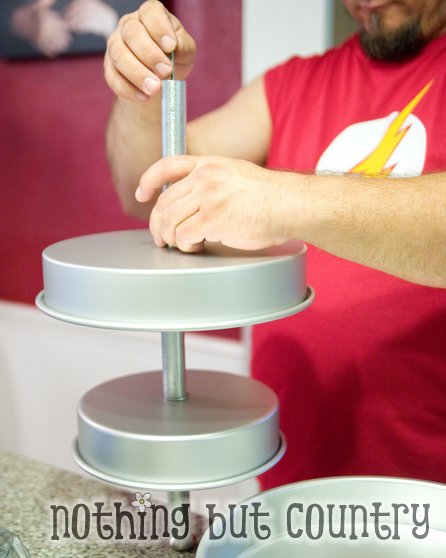
Each layer we added on- we made sure each end of the conduit (except the very top and very bottom) Had washers. Prevent any kind of scratching it may do to the pans.

Better view of the conduit and washers. The Allthread runs thru the entire cupcake stand. That is what keeps it sturdy and together.

The very top of the stand- we used same as Giverslog talks about. A drawer pull. That fit inside of the conduit, and we could use our Allthread to screw the drawer pull on to start to top of the cake stand.
 The very bottom of the cake stand is actually the 4th and smallest cake pan in the set. Just as Lizard and Ladybug blog – Turned it upside down. That is where the Allthread center stops, and we used a small washer and a locking nut- tightened down so it will hold it all together. I wish I got a photo of the bottom for you. However like I said check out the other 2 blogs I mentioned above on their tutorials as well.

Here it is completely assembled. I LOVE IT. I can add ribbon to every layer for all occasions to trade it out.
I can’t stress enough a few steps. Making sure your holes in the center of every pan is truly in the center. And also your conduit pipes are cut straight and not angled. We checked and double checked again. I didn’t want to have to purchase new pans because my holes were in the wrong place. I think finding the center was the hardest part of the whole assembly. (Which means this is a pretty easy project).
I was so nervous when I watched Chad putting this together. I was like OOHH– don’t scratch– eekkk– its crooked. I really need to stay out of the way. HAHAHA He nailed this project on the 1st try. I don’t know why I was worried 🙂

I had to load it up with some cupcakes I had made that day to test it out. 🙂 Here is a bird’s eye view of it in action. LOVE LOVE LOVE IT!!!
If you buy your pans 50% off — and all the other parts-the cost came to approx. $22.00 for this project. The Target one is 21.00 and not exactly what I wanted– and since this is a knock off of the Pottery Barn one– that is $69.00 – So I am very pleased 🙂 And know we will get lots of use out of this.
















SO cute!! Your hubs did a great job…even with you bugging him the whole time. I would have done the same thing. 🙂
I’ve been seeing this project pop up all over and your pictures and description is very helpful. I was afraid to make one and have it look cheap but yours is fantastic! I might just have to see if my hubby wants to help me make one of these!
Your tutorial is great…and of course, it looks amazing!!
Looks great! Definitely looks like the one I’ve been eyeing on Pottery Barn’s site, but at a fraction of the cost!
This is a great tutorial. I have been wanting one like this but didn’t want to spend so mcuh… and everything DIY is better anyways!
How cool! I love that the cupcakes are secure in the pans. Too neat!
This is awesome! I am pinning this for a friend who was just talking about making one!
It’s always fun to create with power tools. Good job!
Love this idea! Our Walmart just started carrying a much larger selection of Wilton pans. I’m heading there today to grab some, so I can make this stand this weekend! Thanks for posting the tutorial.
I LOVE this idea…I came across this post on Skip To My Lou! Thanks so much for sharing!
I’m hosting a linky party at my blog Fusion Fridays {Open All Week!}
http://janedeereblog.blogspot.com
I would love it if you would come by and link up!
I looked all over to find a post that showed how to make a stand without just gluing eveything together. Thanks so much for showing “how to” and what you used.